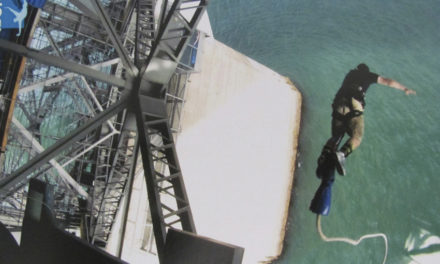
Recently my friend and I successfully launched and recovered a homemade spacecraft. The craft traveled for over 4 hours and more than 103 miles before landing safely in an unoccupied field.
The video above (also available here) details our journey.
Table of Contents:
- The Basic Idea
- Building The Craft
- Predicting The Flight Path
- Working with the Government
- Launch Sequence & Checklists
- Other Helpful Resources
This article covers how to build and launch your own weather balloon spacecraft for around $300.00 USD (not including the optional sensor equipment, most notably the cameras). Please note that the information regarding regulations will vary based on your location. This guide does not constitute legal advice. Remember, I am just some guy on the Internet. Please do your own research to make sure you are following all applicable laws and being safe. This was a tremendous experience for my fiend and I and our hope is that many others can experience the same thrill.
A huge and special thank you to Mel Gray (Scientist and Directory of Photography for this project) for being a fantastic partner on this project.
Additionally, thank you to Dan Schroeder for the logo design and Launch Digital Marketing for the inspiration.
1. The Basic Idea:
In the same way that an air bubble floats in water, helium bubbles float in air. Weather balloons are just large helium bubbles and due to their volume they are able to displace enough air to be able to lift some objects.
These properties mean you can use a weather balloon to lift certain objects up into the Stratosphere. Throughout the ascent and descent, you can use onboard computers and other equipment to measure, film and record a multitude of information about the flight.
Eventually, as the balloon reaches its maximum volume (and maximum altitude) the balloon will rupture from being stretched to its limit and the payload will decent back down to the ground under a parachute. Onboard equipment will then send the location of the landing (and optionally the entire flight path) to a ground operator (normally the same person or team who launched the craft) so that the operator can retrieve the craft and equipment.
Before the launch is conducted, a flight plan (based on location and current and expected weather conditions) must be calculated and reported to the appropriate authorities so that the risk of flying in restricted airspace, landing on private property or endangering others is mitigated. This step is not optional.
Why a Weather Balloon Rather Than a Rocket?
Rockets are super cool! Unfortunately, they have one major flaw. If anything goes wrong with a rocket, it essentially becomes a missile. This is the reason that we see so many rocket explosions on TV. Rather than risking a malfunctioning rocket turning into a missile and accidentally flying toward a population center, it is generally safer for a rocket to self destruct of something critical goes wrong.
For this reason (as well as some others), rockets are heavily regulated and are generally very expensive.
Weather balloons on the other hand, are neither of these things. They are relatively inexpensive (around $80.00 USD) and when under certain limits (with regard to payload weight and function) and within certain jurisdictions, they are largely unregulated.
The combination of cost, relative safety and legality makes weather balloons a far more feasible option for most amateur space enthusiasts.
2. Building The Craft
The craft has three main required parts and the option to add as much extra equipment as feasible.
Design
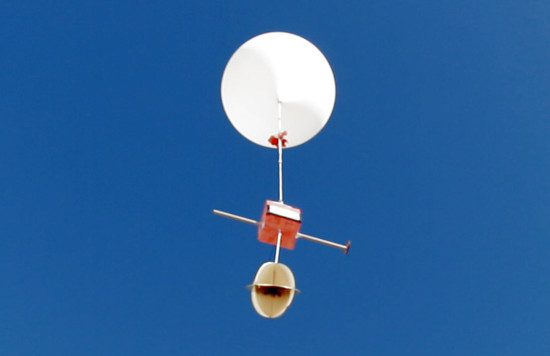
The spacecraft consists of three main parts, the weather balloon, the parachute and the payload. Each of these parts need to work correctly in order for a successful mission.
The Weather Balloon
The weather balloon is the most important part of the craft. It is also the most simple part. It consists of a 600 gram latex ballon (see below for links to recommendations) which can contain 70 cu. ft. of helium at sea level. It is possible to purchase bigger or smaller balloons but due to this size’s relatively simple metrics (typical ascent rate range and price) this is the size that is recommended for first time amateur space enthusiasts.
Be forewarned, there is a global supply shortage of helium available for consumer purchase. This means helium prices can get expensive. The best way to get discount helium is to purchase it from welding companies as they are more willing to sell helium wholesale than party supply stores. You should expect to pay between $80.00 USD and $150.00 USD for the helium, rental tank and safety gear.
You could in theory use hydrogen instead of helium to fill your balloon but this is a very dangerous option and is not recommended. Hydrogen, while less expensive than helium, is extremely flammable and dangerous. See the infamous Hindenburg disaster for more information about the downsides of using hydrogen filled balloons.
Weather Balloon Recommendations:
600 Gram Weather Balloon (This was the most trustworthy and inexpensive option. I used this myself and was very happy with the product and service.)
600 Gram Weather Balloon (Amazon – This is the most convenient option.)
The Parachute
The parachute is the second most error-prone part of the spacecraft (behind the equipment within the payload) and has the real possibility of failing and creating a dangerous situation.
For a 600 gram weather balloon (which is the recommended weight for first time space enthusiasts) you are aiming for a landing speed of 5 meters/second or less. If the landing is too fast, it is dangerous, if it is too slow your chase to recover the payload will likely be much longer and less predictable.
To accommodate these goals, it is recommended that you use a 1 meter diameter parachute.
Parachute Recommendation:
1 Meter Diameter Parachute (Because this piece of gear was so important, I only trusted this particular parachute. It has worked for me flawlessly!)
The Payload
This is the fun part! As long as you stay within the legal limits, you can have the payload be whatever you want.
For most launches, the payload will consist of the following:
Styrofoam Box – Styrofoam is usually the material of choice for a homemade spacecraft as it inexpensive, light, water resistant and holds in heat. This is the box that will hold and contain your other equipment.
Styrofoam Box Recommendation:
Polar Tech 205C Thermo Chill Insulated Carton (This is an easy and inexpensive option that has worked for me. I really like the size too!)
Flight Computer – This will vary widely based on the goals of your mission but generally consists of a Raspberry Pi or Arduino based computer.
Flight Computer Recommendation:
Raspberry Pi 2 (I recommend a Raspberry Pi over Arduino for most cases because the Pi is much more fully featured)
Sensors – This will also vary widely based on the goals of your mission but generally includes sensors like altimeters, thermometers and GPS receivers.
Sensor Recommendation:
This will vary widely based on your mission goals.
Location Tracker – Reliably and consistently recording and transmitting location data on a weather balloon is difficult. Typical GPS solutions will stop receiving location data at around 30,000 feet due to a governor on the Global Positions System itself. (This is done wisely in the name of national defense.) Furthermore, transmission of location data is both highly regulated (within the United States it is illegal to operate a cell phone which is airborne. This obviously includes the Stratosphere :-p) and is logistically difficult (All cell phone and most non-phone based location trackers require cell phone service to transmit data). Therefore, you must use alternative options that are both safe and legal. The best option for most people is the SPOT Gen3 which is highly reliable in extreme climates and uses neither GPS nor cell service to operate.
Location Tracker Recommendation:
SPOT Gen3 (In my opinion, this is the best and only option that should be considered. This tracker has been used on many weather balloon missions all over the globe. It is intended for survival situations and as such is extremely reliable. One important note, this device does require an annual service subscription)
Cameras – If you are going to go through all of the effort of sending something high up into the sky, you might as well film it! While there are many cameras available on the market, most weather balloon experts recommend using GoPro cameras due to their light weight, small footprint, low price and reliability in cold and harsh environments.
Camera Recommendation:
GoPro Hero (This camera is built to be reliable and is well tested in extreme environments including being used on a weather balloon.)
Batteries – It is best to diversify your batteries in order to avoid single points of failure. The recommendation is to use separate batteries for each of your cameras, your location tracker, your flight computer and any other powered equipment you are using. Batteries tend to perform poorly in cold temperatures so it is best to give your equipment as many battery opportunities as possible.
Battery Recommendations:
AAA Batteries: Energizer Ultimate Lithium AAA Batteries (These are the only batteries that I trust for the Spot tracker. They are also the only ones recommended by the manufacturer.)
GoPro Battery Extender Recommendation: Wasabi Power Extended Battery (This is a great inexpensive and reliable option)
Flight Computer Battery: KMASHI 10000mAh External Battery Power Bank (This is highly recommended due to its light weight, low price and durability)
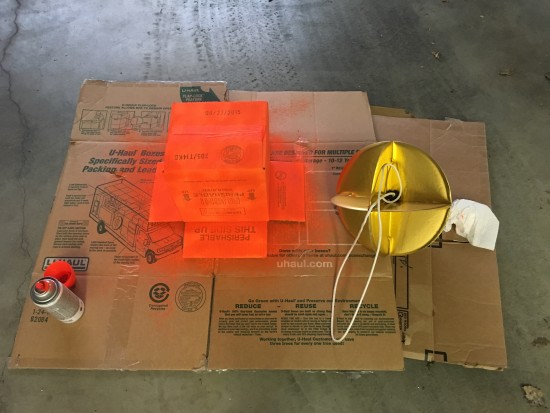
Identification/Harmless Notice – It is highly recommended that you clearly label your craft with a easy to read and weatherproof identification label. This is for use by anyone who might find your craft if you are unable to recover it yourself. As the minimum, this label should include the launch date, launch location, operator phone number and operator e-mail address. Due to the inherent appearance (your spacecraft is going to look weird and alien!) and location (the sky) of your craft, it is vitally important to make it abundantly clear that the craft is not a weapon nor is it dangerous. You should include clear explanations of the purpose of the craft on the identification label.
Harmless Notice Template:
(Be sure to make this weather resistant via a zip lock bag or lamination)
—
THIS IS A HARMLESS SCIENCE EXPERIMENT
This is a high-altitude weather balloon experiment conducted by a group of amateur scientists.
This Balloon Was Launched On: DATE
From: Location
If you find this balloon, please leave it where it is because a chase team will arrive shortly to retrieve the unit.
If you find this box on a later date, please contact:
NAME – PHONE NUMBER
E-MAIL ADDRESS
It is also a good idea to prepurchase a gift for use if you have to retrieve your craft from private property or an irritated discoverer.
Radar Reflector – In most cases your craft won’t naturally show up on most radar systems. This is a risk that isn’t worth taking. While not required, it is very recommended that you include some kind of radar reflector on your craft.
Radar Reflector Recommendation:
Davis Emergency Deluxe Radar Reflector (This is by far the best option. It is inexpensive, light weight and effective)
Additional Gear
See Checklist section for additional gear.
3. Predicting The Flight Path
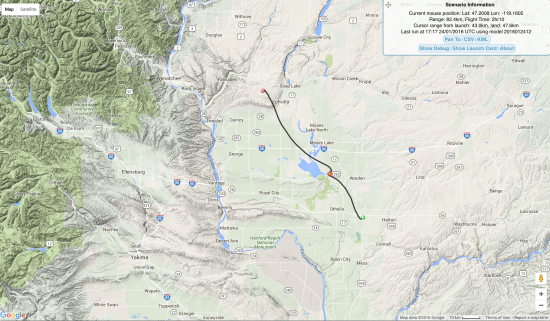
Before you launch anything into the air you should both calculate your projected flight path and report it to the applicable governing bodies. This step is necessary for legal, safety and logistical reasons.
Predicting your weather balloon flight path within the United States is much easier than you likely expect. NOAA sends up a multitude of weather balloon everyday at noon and midnight to collect weather data for use by pilots, meteorologists and other science professionals. (In the same way it is best to erect one crane by using another crane, it is helpful to use weather balloons to help predict the path of other weather balloons.) This data is than combined with radar, direct measurement and historical data (among other sources) to create impressively accurate weather predictions.
You can then use simple online weather balloon specific online calculators to predict your flight path. To do this, you will need to know:
- The date and time of your anticipated launch
- The latitude, longitude and altitude of of your anticipated launch site
- The mass of your total payload
- The size (usually indicated in mass) of your balloon
- Your required lift (as a general best practice for a 600 gram weather ballon, start with 1000 grams of lift. Note this is just a starting point as your real number will vary by payload mass)
You then take that data and input it into the following simulators and tools. If you doing this for the first time and you are using a 600 gram weather balloon, your goals will likely be similar to the following:
- For beginners, a nice place to start is aiming for an ascent time of 120 minutes (this will put you in an achievable window range for being able to film the entire flight on a single battery)
- For beginners, a nice place to start is aiming for an ascent rate under 5 m/s (this will help keep your camera footage reasonably still)
- Avoid restricted airspace (this isn’t just a goal, it is a requirement)
- Avoid major flight paths
- Avoid potentially dangerous landing possibilities (population centers, sensitive areas, private property, bodies of water, mountains, etc.
Flight Path Prediction Tools:
- Hab Hub Flight Path Calculator
- High Altitude Science Flight Path Calculator (Used for calculating predicted flight path)
- Airspace Map Tool (Used for finding restricted airspace, major flight paths, airports and other hazards)
4. Working with the Government (Working With The FAA And Issuing an NOTAM)
Do NOT launch your spacecraft without working with all applicable authorities and ensuring you have done everything possible to ensure safety and legality of your mission. In the United States this means you need to work with the FAA (by filing a NOTAM, avoiding restricted airspace and staying within the regulations of an untethered High Altitude Balloon), the FCC (it is illegal to transmit data at altitude using a cell phone or a device that uses the same frequencies) and be fair and polite about avoiding other people’s private property.
Your the laws that you must follow will vary depending on your specific situation so please be sure to do your own research. Above all else, be safe and don’t endanger property or people.
5. Launch Sequence & Checklists
The following are base examples for creating your own checklists.
4a. 24 Hours To Launch:
This checklist is to be done 24 hours before the launch.
- Check hourly weather
- Measure mass of payload
- Calculate expected flight path
- Issue a NOTAM
- Fill out harmless equipment notice
- Scout out launch location in-person
- Download offline data for predicted landing spot via Google Maps app
- Complete the Critical Gear Test and Inspection Checklist (see below)
- Charge all required batteries
- Replace batteries in Location Tracker with Energizer Lithium batteries
4b. Launch Day Checklist
This checklist is to be done the day of the launch.
- Drive to location
- Lay out launch pad (dropcloth or tarp)
- Take helium tank out of car and place tank sideways on ground next to launch pad
- Put Launch Day Kit on launch pad
- Place payload on launch pad with parachute and radar reflector
- Place supplies on launch pad:
- Gloves
- Rubber Bands
- Knife
- Packing Tape
- Scale
- Anchor
- Anchor Rope
- Gaffers tape
- Set up extra camera to capture b-roll of preparation and launch
- Have all parties who plan to handle balloon put on gloves
- Inflate weather balloon
- Measure lift of balloon
- Tie off and seal balloon with rubber bands and gaffers tape
- Secure balloon to anchor
- Connect the payload to the balloon
- Turn on payload equipment (cameras and the flight computer)
- Secure top of payload box (after putting gear back in)
- Check for positive indicator lights from equipment
- Confirm that Location Tracker is transmitting (using app or onscreen LEDs)
- Launch payload
- Start driving to predicted landing area
4c. Critical Gear Test and Inspection Checklist
It is highly recommended that you thoroughly test and visually inspect the following gear before launch:
- Weather Balloon
- Parachute
- Styrofoam Box
- Flight Computer
- Location Tracker: SPOT Gen3
- Camera(s)
- Batteries
- Radar Reflector
4d. Launch Day Kit
The following are the supplies that should be included in a Launch Day Kit.
- Launch Pad (Tarp)
- Duct Tape
- Gaffers Tape
- Packing Tape
- Knife
- Rubber tube for balloon inflation (goes from tank to balloon)
- Gloves
- Rubber Bands
- Scale (for calculating weight)
- Anchor (weight to prevent inflated balloon from floating away)
- Rope for Anchor
- Extra Rope
- Extra batteries for Location Tracker
- Extra batteries for scale
- Extra batteries for cameras
- Weather applicable clothing (hats/gloves/boots/wool socks)
4e. Chase Kit
The following are the supplies that should be included in a Chase Team Kit.
- Boots
- Battery extender/pack for cell phone
- Binoculars
- Night vision goggles
- High powered flashlights
- Extra batteries for flashlights
- Alternative network SIM card (cell phone must be unlocked)
- Hard drives to backup footage
- MiniSD to SD converter
- Tow line for car (in case car gets stuck)
4f. Construction Supply Kit
- Zip Ties
- Fluorescent Orange Spray Paint
- GoPro Dehumidifiers
- Dry Wall Knife (For cutting payload box)
- Styrofoam Cutter/Melter
- Duct Tape
5. Other Helpful Resources:
Many people have written about their experiences launching weather balloons. As is true with any scientific endeavor, the more tests and data that you can learn from, the better. The following are additional guides for launching weather balloons.
- Tool for calculating balloon trajectory – http://weather.uwyo.edu/polar/balloon_traj.html
- Tool for Avoiding restricted airspace – http://skyvector.com/
- Great Tutorials on Specific Steps – http://www.highaltitudescience.com/pages/tutorials
- Hartley Brody’s Experience Part 1 – https://blog.hartleybrody.com/in-space/
- Hartley Brody’s Experience Part 2 – https://blog.hartleybrody.com/found-balloon/
- DIY Weather Balloon Tutorial – http://www.brainstuffshow.com/blog/diy-how-to-launch-a-weather-balloon-into-space/ (another overview of the process)
- Tutorial – http://www.kb3vfe.com/2012/07/how-to-launch-weather-balloon-for.html
- Parachute Information – http://sentintospace.com/tutorials/parachute/
- 1595 Dragon’s High Altitude Experience – http://www.1595dragons.org/balloon.html